All three VPN types (IKEv2 VPN, SSL VPN, and Clientless SSL VPN) are available on Windows 8. The following instructions will help you create and use the VPN option of your choice. For more information on the VPN types, see VPN.
These instructions also apply to Windows 10. Menus and windows may look a little different, but the steps to follow should generally be the same.
Contents
Using the IKEV2 VPN Option (preferred)
Setup the CAEDM IKEv2 VPN on Windows 8, 8.1, or 10
- Navigate to the Windows Desktop
- Right click on the Network icon in the taskbar
- Click Open Network and Sharing Center
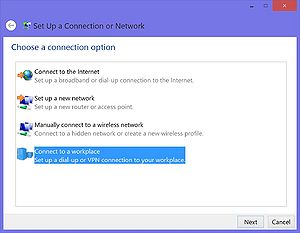
- On the Change your network settings window that opens, click Set up a new connection or network
- Click Connect to a workplace
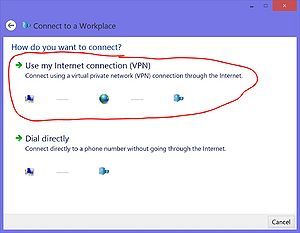
- Click Use my Internet connection (VPN)
- For the Internet Address, type in
vpn.et.byu.edu - In the Destination Name field, type
CAEDM IKEv2 VPN - Click Create
- Wait for the connection to be created, and then close the window
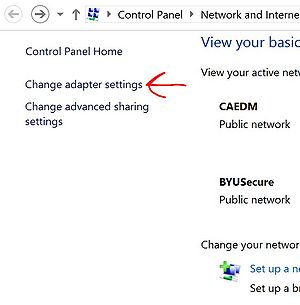
- In the Network and Sharing Center window you opened before, click Change adapter settings
- Right click on CAEDM IKEv2 VPN in the window that opens and then click Properties
- Click to the Security tab
- Set Type of VPN to IKEv2
- Make sure Data encryption is set to Require encryption (disconnect if server declines)
- Make sure Authentication is set for Use Extensible Authentication Protocol (EAP) and Secured password(EAP-MSCHAP v2) (encryption enabled) is also set.
- Close the Properties window by clicking OK
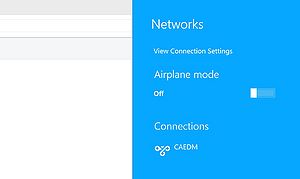
- Click the Network icon in the taskbar. The resulting windows could look like the picture here, or could have a picture of a computer screen, but it will be in roughly the same place.
- In the sidepane that opens, click CAEDM IKEv2 VPN and then click Connect
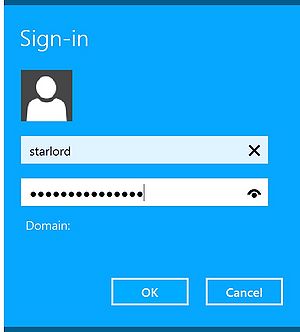
- Enter your username and password, and click Connect
You are now connected to the CAEDM IKEv2 VPN
To connect to the CAEDM IKEv2 VPN on Windows 8, 8.1, or 10
- Click the Network icon in the system tray.
- Click CAEDM IKEv2 VPN in the list.
- Click the Connect button when it appears.
- Enter your username and password in the appropriate fields.
- Click the OK button.
You are now connected to the CAEDM IKEv2 VPN.
To disconnect from the CAEDM IKEv2 VPN on Windows 8, 8.1, or 10
- Click the Network icon in the system tray.
- Click CAEDM IKEv2 VPN in the list.
- Click the Disconnect button when it appears.
You are now disconnected from the CAEDM IKEv2 VPN.
Using the CAEDM SSL VPN Option
Setup the CAEDM SSL VPN on Windows 8, 8.1, or 10
- Using your web browser, go to "https://vpn.et.byu.edu"
- Login to the blue Please Login screen.
- NOTE: If you get an orange login screen, then you have entered the wrong address and you will not be able to login. Try again with the exact address listed above.
- Download the FortiClient installer for Windows from the list of downloads.
- NOTE: You can alternatively download the FortiClient from www.forticlient.com.
- Run the client installer you just downloaded. The install process will:
- Unpack the installer,
- Run a virus scan,
- Present you will a license agreement, which you will have to accept to continue,
- Prompt for Complete or VPN only install; click the VPN Only button,
- Prompt for an install location; accept the default,
- Prompt to confirm your previous selections
- Continue installing the client.
- NOTE: The installer will create a new "fortissl" adapter in your list of network connections. Do not change or remove the fortissl adapter, or the SSL VPN will not work.
- Prompt to finish the install; Click Finish.
- Open the FortiClient either from the Start Menu, or from the system tray.
- Click Configure VPN.
- Select the SSL-VPN button at the top, if it is not already selected.
- In Connection Name, enter
CAEDM SSL VPN. - Enter a description of your choosing.
- In Remote Gateway, enter
vpn.et.byu.edu - Click Apply, and then click Close
To connect to the CAEDM SSL VPN
- Open the FortiClient application, either from Start Menu, or from your task bar.
- Select the CAEDM SSL VPN connection, if it is not already selected.
- Enter your username and password, if necessary.
- Click Connect.
- If you are connecting for the first time, you may be prompted to Set Network Location. If so, select Work Network, and click Close.
You are now connected to the CAEDM SSL VPN.
To disconnect from the CAEDM SSL VPN
- Click on the FortiClient icon on your task bar.
- Click Disconnect.
Using the Clientless SSL VPN Option
- Go to https://vpn.et.byu.edu/ using your browser of choice.
- Enter your CAEDM username and password, and then click "Login"


