| The information on this page is badly out-of-date. It describes a system that is no longer in production or has drastically changed, and needs to be updated or rewritten. |
When you connect to the VPN, your computer establishes an encrypted link to CAEDM and becomes part of the college network. You're able to access resources as if your computer was hooked in to the college network here on campus.
When to use the VPN
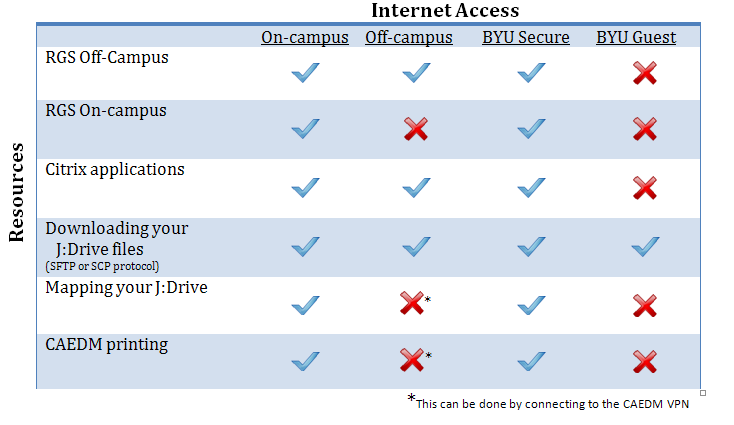
Most CAEDM remote computing resources can be used off campus without using the VPN. The VPN is needed only to access resources that are designed specifically be available exclusively on-campus, either for security or licensing reasons. By design, most computers in research areas, faculty and staff machines, and other computers not intended to be accessible from the internet are behind a "firewall", protecting them from attacks on the internet. The VPN makes your off-campus computer appear as if it were on-campus, making these additional computers reachable.
As seen in the table above, the VPN will allow off-campus connections to map a J Drive, or to print from off-campus to a CAEDM lab printer, but is not necessary for reaching RGS, Citrix, or SSH. It is also not necessary for reaching CAEDM hosted websites. Note that using the VPN will not grant you any additional access while using BYU Guest Wireless.
Protocols
There are two ways of connecting to the college VPN. The first method uses PPTP (Point-to-Point Tunneling Protocol) and is the recommended way to connect; the second method tunnels a PPTP connection through an L2TP (Layer-two Tunneling Protocol) connection.
Installing and Using the VPN
Quick Installation Facts
Servername: fortress.et.byu.edu
Protocol: PPTP (Preferred)
DNS Server: 128.187.48.2
WINS Servers: 10.8.120.176 and 10.8.120.177
Connecting to the CAEDM VPN with Windows XP
To create a regular PPTP connection:
- Open the New Connection Wizard (usually by double-clicking on the Networking control panel, then double-clicking “Make New Connection”).
- Specify a new VPN connection to fortress.et.byu.edu.
- Right-click on the new connection and choose “Properties.”
- Using the Networking tab of the Properties dialogue box, configure the VPN connection to be a PPTP connection, and (optionally, for security) disable File and Printer Sharing.
- Set the DNS server for this connection to be 128.187.48.2 and the WINS servers to be 10.8.120.176 and 10.8.120.177.
Connecting to the CAEDM VPN with Windows 7
The following configuration instructions are covered in the How-to Video, " Using the VPN"
- Step 1: Click the “Internet Access” button in the system tray.
- Step 2: On the bottom of the box that pops up, click “Open Network and Sharing Center.”
- Step 3: Click “Set up a new connection or network” from list of options.
- Step 4: Click “Connect to a workplace”, and the “Next” button.
- Step 5: Click “Use My Internet Connection” and click the “Next” button.
- Step 6: Enter the following information in the boxes:
Internet Address: fortress.et.byu.edu
Destination Name: CAEDM
And click the “Next” button.
- Step 7: Enter your CAEDM username and password into the appropriate fields but leave the domain field blank! Mark the "Don't connect now; just set it up so I can connect later" Then, click the “Next” button.
- Step 8. Again click the “Internet Access” button in the system tray. Right click CAEDM and then click “Properties.”
- Step 9. Click on the "Security" tab. Then for "Type of VPN" choose "Point to Point Tunneling Protocol (PPTP)". Then click "OK". Click on the “Networking” tab. Highlight “Internet Protocol Version 4” and click “Properties.”
- Step 10. Click the “Advanced” button.
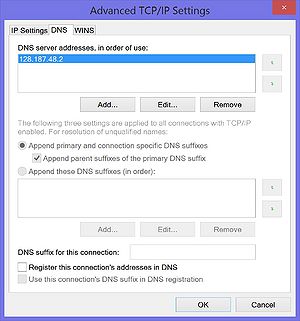
- Step 11. Click on the DNS tab, and click the “Add” button. In the dialog type 128.187.48.2 and click “Add.”
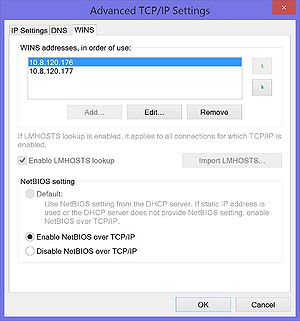
- Step 12. Click on the “WINS” tab. Click “Add” in the dialog type 10.8.120.176. Repeat this step and type 10.8.120.177 to add a second WINS entry.
- Step 13. Click “OK” and “Close” buttons until all dialogs are closed. VPN’s done.
To connect to the configured VPN you can click the “Internet Access” button shown in Step 1, click CAEDM, and click the “Connect” button. Unless you save your credentials, you will be asked to re-enter your username and password.
Connecting to VPN with Windows 8 or 8.1
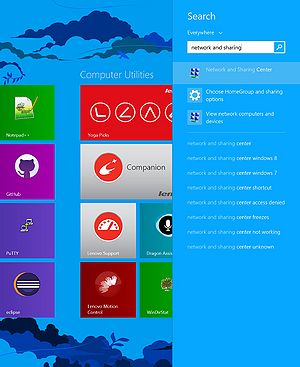
- Step 1: Open the start menu and search "network and sharing", and then click on the "Network and Sharing Center"
- Step 2: On the window that opens, click "Set up a new connection or network"
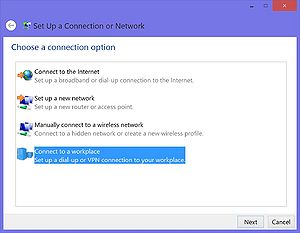
- Step 3: Click "Connect to a workplace"
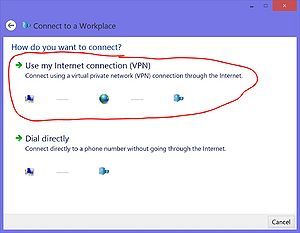
- Step 4: Click "Use my Internet connection (VPN)
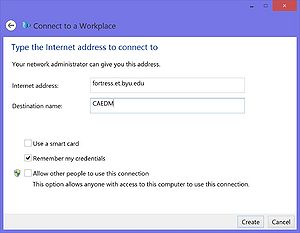
- Step 5: For the internet address, type in "fortress.et.byu.edu", for the Destination name, type "CAEDM", and then click "create".
- Step 6: Wait for the connection to be created, and then close the window.
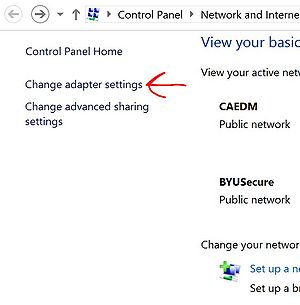
- Step 7: In the Network and Sharing Center window you opened before, click "Change adapter settings".
- Step 8: Right click on "CAEDM" in the window that opens and then click "Properties"
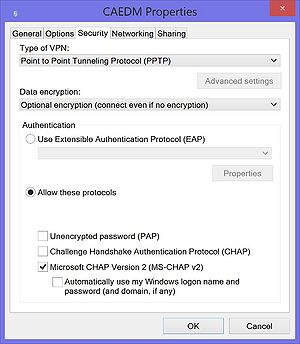
- Step 9: Click to the security tab, and make sure it looks like the image below.
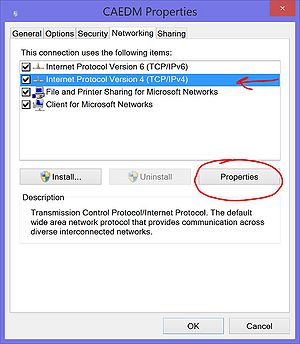
- Step 10: Click on the Networking tab and then highlight "Internet Protocol Version 4 (TCP/IPv4)" and click "Properties".
- Step 11: On the window that opens, click "Advanced..."
- Step 12: On the DNS tab on the window that opens, click "Add" and put in the address "128.187.48.2" and click "Add"
- Step 13: On the wins tab, add two addresses: 10.8.120.176, and 10.8.120.177.
- Step 14: Click "OK" or "Apply" on all of the open windows.
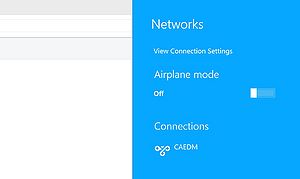
- Step 15: Click the icon in the taskbar that has your connection on it. It could look like the picture here, or could have a picture of a computer screen, but it will be in roughly the same place.
- Step 16: In the sidepane that opens, click "CAEDM" and then click "Connect"
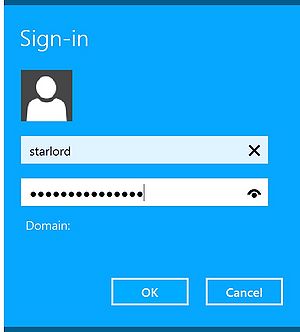
- Step 17: Enter your username and password and you should be connected!
Connecting to the VPN with OS X
- Open up the System Preferences Application
- Select 'Network'
- On the Network Settings window click the '+' symbol in the lower-left corner. (It's right above the lock)
- A window will drop down from the top prompting you to select an interface. Select VPN. Another menu will appear, select PPTP. Finally, it will ask what you can call it, you can choose whatever you like.
- Click 'Create'
- Once you select 'Create,' it will bring you back to the main window where you will be able to alter the settings. For server address, type 'fortress.et.byu.edu' for Account Name type your caedm username. Select Automatic Encryption.
- Make sure 'Show VPN status in menu bar' is selected. It makes it a lot easier to connect to CAEDM in the future.
- Hit the 'Authentication Settings..." button.
- Select Password and enter your CAEDM password. Press 'OK'
- Hit the 'Advanced..." button.
- Select the 'DNS' screen. Add the following DNS address: 128.187.48.2
- Hit 'OK'
- Okay, you should be ready to connect. Hit the 'Connect' button.
- It will take a second, but eventually you should see that the red button next to your new VPN connection should turn to green.
- if the VPN does not appear to work, try going to Preferences -> Network -> VPN -> Advanced -> Options, and check the box "Send all traffic over VPN connection."
Connecting to the VPN with Ubuntu
- Open the network connections menu from the top right and select 'Edit Connections'.
- Choose the VPN tab and click 'Add'.
- In the IPv4 settings tab
- Set method to 'Automatic (VPN)'
- Set 'Additional DNS Servers' to 128.187.48.2,10.8.120.176,10.8.120.177
- In the 'VPN' tab
- Set 'Gateway' to fortress.et.byu.edu
- Set 'Username' and 'Password' using your CAEDM credentials.
- Click 'Save'
- Go back to the network connections menu from before, hover your mouse over the 'VPN Connections' menu item, then click on the VPN that you just created.
- Wait a few seconds and a network message should pop up to inform you that the VPN successfully connected.
- A small lock will also appear next to the network icon in the top right of the menu bar.
Troubleshooting
- If you are going to be using programs installed on your local computer that require a licence server, make sure that you include the et.byu.edu extension.
Example: Wizbang 2000 requires a licence server to run. Normally, that licence server would be set to something like "1234@licserv", when using the VPN, it needs to be "1234@licserv.et.byu.edu". This will route the licence request through VPN, and will then be able to find the licence server. You can add the et.byu.edu and it will work just fine on campus as well, in addition to off-campus locations.
- You cannot currently use L2TP on Windows 7

